
Searching audit trails: the One Identity Safeguard for Privileged Sessions (SPS) connection database
One Identity Safeguard for Privileged Sessions (SPS) has a search interface for browsing the audit trails. This connection database also contains the various meta-information about connections and connection-requests. The search queries can include only alphanumerical characters.
To access the search interface, navigate to Search. Only users with the following privileges can access the Search page:
-
Members of groups who are configured as Authorizers with the Search or Search&Authorize permission set in the Access Control field of a connection policy. These users can access only the audit trails of the respective connections.
For more information on configuring authorizers for a connection, see Configuring four-eyes authorization.
-
Members of groups who have the Search privilege set.
Assigning the Search privilege to a user on the AAA page automatically enables the Search in all connections privilege, and grants the user access to every audit trail, even if the user is not a member of the groups listed in the Access Control option of the particular connection policy.
For more information on configuring user rights, see Managing user rights and usergroups.
-
The admin user.
Figure 311: Search — Browse the connections database
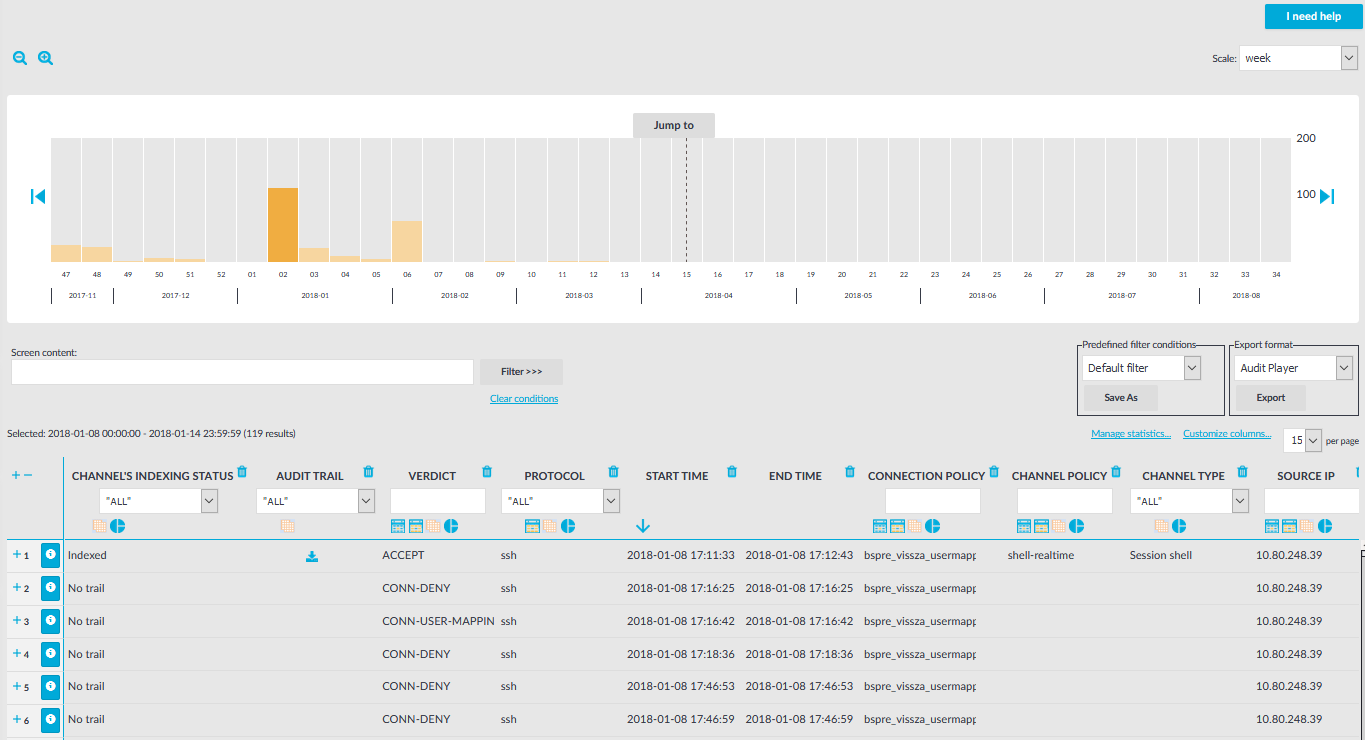
Changing the time interval
The bars display the number of results in the selected interval. Use the 

Hovering the mouse above a bar displays the number of entries and the start and end date of the period that the bar represents. Click a bar to display the entries of that period in the table. Use Shift+Click to select multiple bars.
Searching connections
|
|
NOTE:
This feature is available only if auditing and content indexing was requested for the connection. For details, see Configuring the internal indexer. |

To search in the content of the indexed audit trails, enter your search keywords in the Screen content field, and click Filter. Search is case insensitive. You can use complex expressions and boolean operators. For more information, see Using the content search.
Filtering search results
Connection metadata is displayed in customizable columns that you can filter for any parameter, or a combination of parameters. To filter the list of search results, enter the filter expression in the input field of the appropriate column, and press Enter, or click on an entry in the table.
For the description of the available columns, see Connection metadata.
For information on using and saving filters, see Using and managing search filters.
|
|
NOTE:
When you use filters, the bars display the statistics of the filtered results. |
Filtering displays also partial matches. You can use the 


To restore the original table, click Clear conditions.
|
|
TIP:
Use the drop-down menu of the Protocol column to quickly filter the list for a single protocol. |
Exporting the search results
To export the search results as a comma-separated text file, select Export format > CSV, and click Export.
For instructions on displaying statistics about your search results, see Displaying statistics on search results.
Viewing the details of a connection
To display the summary of a connection, click 

To download the audit trail of a session, click the 